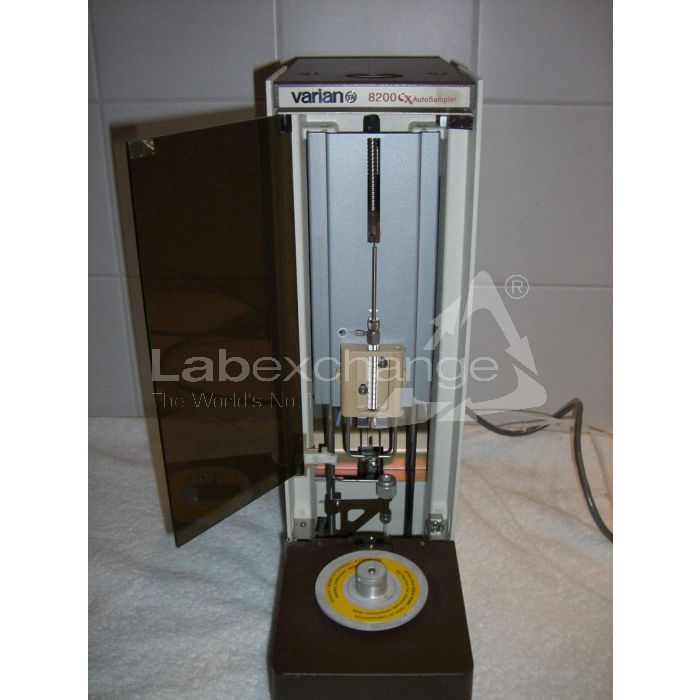
Varian 8200 CX
| Objektnummer | B00017758 |
|---|---|
| ID-Nummer | 017758 |
| Objektbezeichnung | Varian 8200 CX |
| Status | Archiviertes Produkt |
Produktgruppe: HPLC-Autosampler
Status, Liefer- und Zahlungsbedingungen
Geräteüberprüfung
Die gebrauchten Laborgräte werden vor der Auslieferung von der Labexchange Service GmbH überprüft. Sie erhalten voll funktionsfähige Geräte.
Versandzeit
Die angegebenen Versandzeiten sind die jeweils kürzesten für einen Artikel. Die tatsächlich Versandzeiten können im Einzelfall davon abweichen. Die endgültigen Versandzeiten werden in der Auftragsbestätigung angegeben.
Bei Bestellung/Anfrage von mehreren Artikeln bieten wir grundsätzlich Sammellieferung an. Die Versandzeit berechnet sich nach der Position mit der längsten Versandzeit. Auf ausdrücklichen Wunsch ist eine Teillieferung möglich.
Versandarten
Paketdienste, Speditionen, Selbstabholung, Lieferung durch Labexchange-Fuhrpark
Lieferinformationen
Unsere Lieferbedingungen sind grundsätzlich zzgl. Versandkosten. Angegebene Versandkosten sind zu erwarten. Falls anfallende Versandkosten nicht angegeben sind, fragen Sie diese bitte gesondert an.
Die angegebenen Fracht- und Verpackungskosten beziehen sich auf den günstigsten Transportweg und sind vorbehaltlich unvorhergesehener Kostensteigerungen. Durch unvorhersehbare Ereignisse können sich die Frachtraten und die Lieferzeiten jederzeit ändern und müssten der aktuellen Situation angepasst werden. Incoterm-Kodierung gemäß Incoterms 2010: Bei Selbstabholung EXW, bei Sendungen per Schiff CFR, per Luftfracht CPT, übrige Sendungen DAP. Hinweis für Auslandssendungen: Ein Präferenznachweis/EUR1 wird von uns nicht ausgestellt. Bei Selbstabholung/EXW aus Drittländern und der EU werden 16% MWSt als Kaution einbehalten bis wir die Gelangensbestätigung/den Verbringungsnachweis des Käufers erhalten haben.
Zahlungsbedingungen
Wir akzeptieren keine Zahlung per Letter of Credit, PayPal etc. Der Rechnungsbetrag ist in jedem Fall ohne Abzug fällig. Die Ware bleibt bis zur vollständigen Bezahlung unser Eigentum. Skonto wird nicht gewährt.
|
Land |
Mögliche Zahlungsarten |
Bemerkung |
|
DE, AT, CH |
Rechnung, Vorkasse, Kreditkarte |
Eine Zahlung per Rechnung ist nur für Firmenkunden möglich. |
|
NL, BE, LU |
Rechnung, Vorkasse, Kreditkarte |
Eine Zahlung per Rechnung ist nur für Firmenkunden möglich. |
|
Alle weiteren Länder |
Vorkasse, Kreditkarte |
|
Es gelten unsere Allgemeinen Verkaufs-, Lieferungs- und Zahlungsbedingungen. Diese finden Sie hier. Zwischenverkauf, sowie Irrtum und Preisänderungen sind vorbehalten.
Statusdefinition
Alle Artikel sind gebrauchte Artikel, es sei denn ein Artikel wird explizit als Neugerät aufgeführt.
|
Status |
Zustand |
Bemerkung |
|
Sofort verfügbar |
gebraucht |
Der Artikel wurde bereits überprüft und befindet sich in einem einwandfreien Zustand. Er kann direkt an Sie versendet werden. |
| Lagergerät |
gebraucht |
Der Artikel befindet sich in unserem Lager. Unsere Techniker werden den Artikel vor der Auslieferung überprüfen. Sie erhalten voll funktionsfähige Artikel. |
|
Anbieter |
gebraucht |
Der Artikel befindet sich noch beim Anbieter. Nach Ihrer Bestellung wird er von uns angekauft, überprüft und an Sie versendet. Ein Funktionszertifikat und ein Servicebericht sind bei der Lieferung enthalten. |
|
Neugerät |
neu |
Es handelt sich um einen fabrikneuen Artikel. Es gelten die Garantiebestimmungen des Herstellers sowie die gesetzliche Gewährleistungsfrist. |
|
Labprocure |
gebraucht |
Verantwortlich für den Inhalt dieses Geräteangebotes ist die Labprocure GmbH als Geräteinserent. Labprocure übernimmt die Haftung für die hier inserierten Angebote und für die beinhalteten Fotos und Angebotstexte. Labprocure GmbH, Bruckstrasse 58, 72393 Burladingen. |
Firma: Varian
The following illustrations and descriptions are referring to the instrument model and are drawn from brochures. They are not representing the delivery volume. The exact delivery content you will find only in the offering text.
Introduction
The 8200 CX AutoSampler mounts over the injectors on the top cover of the Varian Series 3000 Gas Chromatographs (with the exception of the 3300). The 8200 CX AutoSampler is operated through the keypad on the front panel of the GC.
The AutoSampler is not powered through the GC but through a "power entry module" located on the rear panel of the Pneumatics Module. The main power switch, fuse(s) and voltage selection components are also located on this rear panel. The AutoSampler can be operated at 100, 120, 220, and 240 Volts, 50/60 Hz, single phase, or Split phase (phase/phase) power. For the procedure to select the appropriate voltage for the 8200 CX AutoSampler, see Section 2, paragraph 2.7 of this manual. For the procedure to change fuses, see Section 6, paragraph 6.6 of this manual.
In Order for the 8200 CX AutoSampler to operate with the 3000 Series GC, the GC must be equipped with the most recent version of the 8200 CX IBDH/CPU PC Board (see paragraph 2.3.1, Section 2).
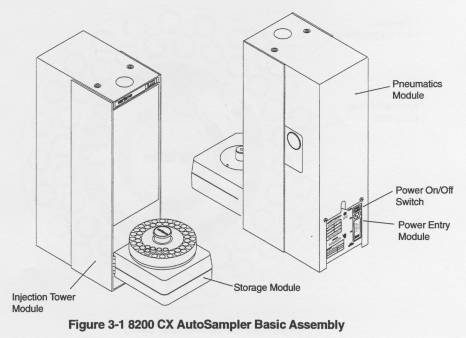
The 8200 CX AutoSampler is constructed of three modules: Storage Module, Injection Tower Module, and Pneumatics Module. Refer to Figure 3-1.
Storage Module
The Storage Module consists of: 48-vial carrousel, turntable, Position Sensor Board, vial sensors, and two synchronous motors that rotate the turntable and move it in and out of the sampling position. The Storage Module is hinged to the Injection Tower and mounts left-hand (standard), or right-hand (optional for the Star 3600 CX GC).
A power ON indicator (LED) is located on the front right side of the Storage Module. This LED lights when the power cord is properly connected and the power switch of the AutoSampler is turned ON.
Carrousel (Vial Racks)
The carrousel is constructed of a chemically resistant polymer 5-3/4" diameter x 1-1/4" deep and can hold up to forty-eight 2 mL vials. A Center knob allows you to easily lift and reposition the turntable. A small raised indicator marks the Home vial position.
The carrousel is divided into four sections (racks) of 12 vial positions. There are four rack numbers: 1, 2, 3, and 4. The 8200 CX AutoSampler can be operated in rack automation (with separate GC methods for each rack) as well as sequence automation. All samples in the carrousel are sampled sequentially. Random sampling is not possible uniess the 8200 CX AutoSampler is controlled through the GC Star Workstation.
The carrousel label designates the location of the four virtual racks, as well as the location of the Home position (Rack 1, Vial 1). Position the label on the carrousel using the keyed Gutout. See Figure 3-2. The carrousel label uses a semi-permanent adhesive that permits the label to be easily removed and replaced. Refer to Appendix C when you need to Order additional labels.
Solenoid Valves Assignments
The five solenoid valves in the pneumatics module are assigned (see Figure 3-6) as:
Ll Controls solvent flow from Reservoir B to the syringe side arm.
L2 Controls solvent flow from Reservoir A to the syringe side arm.
L3 Pressures Solvent Reservoir A.
L5 Pressures Solvent Reservoir B.
L7 Actuates the walte arm assembly (aligned with the needie).
Power Entry Module
The Power Entry Module is located on the lower rear panel of the Pneumatics Module and includes: main power switch; main power cord receptacle; fuse(s); and, voltage selection card. Before connecting to the AutoSampler to power, check the voltage selection (paragraph 2.7 in Section 2) to be sure that the white pin is in the hole that matches the voltage rating stamped on the serial number labet. Instructions for changing the fuse(s) are found in Section 6, paragraph 6.6.
8200 CX Controller PC Board
The 8200 CX Controller PC Board, including the Power Supply circuit, is mounted on the rear wall of the Pneumatics Module. To access the 8200 CX Controller PC Board, remove the Pneumatics Module cover. Electrical leads to the five solenoid valves, and the syringe carriage stop solenoid (L4) connect at J8 on the 8200 CX Controller PC Board. The leads from each solenoid terminate in a two-pin connector. Plug each valve connector into a specific location at J8. See Figure 3-7. DO NOT remove the tie wrap from the connectors plugged into J8.
Injection Tower Module
The Injection Tower Module houses the syringe carriage and syringe mounting hardware, syringe carriage drive stepper motor, waste cup, and syringe plunger stepping motor drive assembly. The Injection Module, complete with the hinged Storage Module, bolts to the Pneumatics Module.
Syringe carriage
The syringe carriage is moved through vial sampling, injecting, and washing positions by a stepping motor and timing belt. See Figure 3-8.
At the end of a run, the syringe carriage returns to the "Horne" position. If power is turned off or there is a power failure, the stop solenoid opens and the carriage drops to its rest position an the stop latch. When the power is restored, the stop solenoid pulls in and the carriage returns to its operating "Horne" position.
NOTE. When aligning the 8200 CX AutoSampler syringe, the power must be ON to both the GC and the AutoSampler.
Syringe Needle Assembly
The syringe/needie assembly (P/N 03-918986-00) includes: 10 gL syringe with a side inlet fitting; plunger guide; and, non-coring side hole needie (P/N 03-918987-00). See Figure 3-9.
Waste Arm/Cup Assembly
The waste arm is electrically driven to the "out" position by an electrical solenoid and is spring returned to the In" position. The waste arm positions the cup under the needle during washing or flushing cycles, and in the retracted position during sample injection.
When it becomes necessary to change the waste cup seal (septum), replace only with P/N 00-997628-00. A supply of these seals is included in the Standard Accessory Kit. Install the new seal with the Teflon@ coated surface down. See Figure 3-10.
There is no fixed schedule for changing the waste cup seal. Repetitive plugging of the needle may indicate the need to change the seal.
Vial Retainer Arm
The vial retainer arm is a metal bar clamped in a plastic holder that is positioned just above the hole in the sample vial cap. The retainer prevents the vial from lifting from the carrousel when the needle is withdrawn from the vial. During injection the retainer is moved out of the syringe carriage path by the syringe carriage as it descends. When the syringe carriage moves up from the inject position the retainer returns to its normal position over the vial. Figure 3-11 shows the retainer in its correct position.
The vial retainer arm is adjusted at the factory to align with the syringe needle guide. If the vial retainer arm is out of position, the arm Gould either interfere with the Operation of the needle guide, or fail to hold the vial in the carrousel during the withdrawal of the syringe needle.
Adjustments to the vial retainer arm should be performed by a Varian Customer Support Representative.
Solvent Flush Injection (Standard Mode)
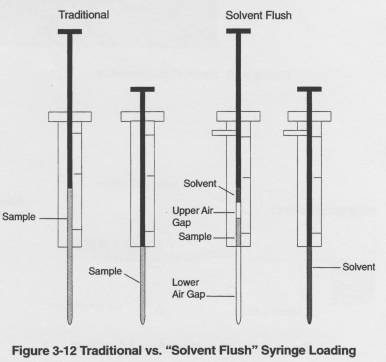
The 8200 CX AutoSampler (in the standard mode) uses an automated "solvent flush" sample injection technique. This injection mode brackets the sample between two air gaps followed by a solvent plug that sweeps the sample from the syringe and needle.
Once you haue entered the sample and solvent plug volumes, the syringe is loaded automatically. The upper and lower air gap volumes are fixed at 0.5 and 0.8 microliters, respectively. The solvent plug that follows the sample ensures that the entire sample is flushed out of the syringe and needle and that the needle is filled with solvent.
Comparative studies show that the automated solvent flush injection technique, whether the sample is injected into hot, cold, split, or splitless injectors, result in consistently lower %RSD values than the traditional sample injection technique.
To set values for the solvent flush method, refer to Section 4, Operation, of this manual.
Typical Sampling and Injection Sequence
The typical sampling and injection sequence of the 8200 CX AutoSampler, proceeds as follows:
1. The solvent plug is sized. The syringe plunger fully retracts past the side arm inlet of the syringe barrel. The waste cup moves under the syringe, the syringe drives down to insert the needle into the waste cup.
2. Either Reservoir A or Reservoir B is pressurized. Solvent moves through the syringe barrel and needle. This solvent may or may not be identical to the sample solvent.
3. The syringe plunger moves downward while the reservoir is pressurized. The plunger stups before it reaches the bottom of the barrel, leaving a predetermined amount of solvent in the syringe (the solvent flush plug).
4. The needle withdraws from the waste cup. Immediately the syringe plunger withdraws slightly to create an upper air gap of predetermined size (0.5 gL). The waste cup withdraws from the syringe path.
5. The carrousel moves to its position under the syringe, and rotates until the selected sampie vial is below the syringe needle.
6. The syringe carriage moves down until the syringe needle pierces the sample vial septum and entern the sample.
7. The syringe plunger moves up and withdraws from the sample vial a predetermined amount of sampie into the syringe at a predetermined uptake rate. The plunger pausen in the high position for a predetermined time before the syringe carriage moves up and the needle withdraws from the vial.
8. The syringe plunger moves up 0.8 gL to introduce a lower air gap below the sample plug.
9. The sample carrousel moves to the forward position and out of the syringe path. The syringe carriage moves down and the needle pierces the GC injector septum. The syringe plunger moves down injecting the sample and a portion of the solvent plug leaving the remainder of the solvent in the needle.
10. The syringe carriage moves to its top position; the waste cup moves into position below the needle. The syringe carriage moves down and the needle inserts in the waste cup. The syringe plunger moves up and clears the side arm port. Solvent A or solvent B flushes through the syringe for a predetermined wash cycle. At the completion of the wash cycle, the next loading and injection sequence beginn (if in multiple injection mode) or waits for a manual start (if in single injection mode).
For a comparison of traditional syringe loading and "solvent flush" syringe loading
techniques, see Figure 3-12.
Optional Injection Moden
For descriptions of injection modes other than the standard mode, refer to paragraph 4.6, Section 4. If solvent contamination is a particular concern, as in the case of undiluted or pure samples, use the Neat injection mode. To operate the 8200 CX AutoSampler in the Neat mode, see paragraph 4.6, Section 4.
Fragen?
Ihr Labexchange-Team hilft gerne weiter:

Christian Schmid
Labor und Analytik, Laboreinrichtung, Life Science

Hubert Sauter
Spektroskopie, Chromatographie


