Kontron Uvikon 860
| Objektnummer | B00011662 |
|---|---|
| ID-Nummer | 011662 |
| Objektbezeichnung | Kontron Uvikon 860 |
| Status | Archiviertes Produkt |
Produktgruppe: Photometer / Spektralphotometer
Status, Liefer- und Zahlungsbedingungen
Geräteüberprüfung
Die gebrauchten Laborgräte werden vor der Auslieferung von der Labexchange Service GmbH überprüft. Sie erhalten voll funktionsfähige Geräte.
Versandzeit
Die angegebenen Versandzeiten sind die jeweils kürzesten für einen Artikel. Die tatsächlich Versandzeiten können im Einzelfall davon abweichen. Die endgültigen Versandzeiten werden in der Auftragsbestätigung angegeben.
Bei Bestellung/Anfrage von mehreren Artikeln bieten wir grundsätzlich Sammellieferung an. Die Versandzeit berechnet sich nach der Position mit der längsten Versandzeit. Auf ausdrücklichen Wunsch ist eine Teillieferung möglich.
Versandarten
Paketdienste, Speditionen, Selbstabholung, Lieferung durch Labexchange-Fuhrpark
Lieferinformationen
Unsere Lieferbedingungen sind grundsätzlich zzgl. Versandkosten. Angegebene Versandkosten sind zu erwarten. Falls anfallende Versandkosten nicht angegeben sind, fragen Sie diese bitte gesondert an.
Die angegebenen Fracht- und Verpackungskosten beziehen sich auf den günstigsten Transportweg und sind vorbehaltlich unvorhergesehener Kostensteigerungen. Durch unvorhersehbare Ereignisse können sich die Frachtraten und die Lieferzeiten jederzeit ändern und müssten der aktuellen Situation angepasst werden. Incoterm-Kodierung gemäß Incoterms 2010: Bei Selbstabholung EXW, bei Sendungen per Schiff CFR, per Luftfracht CPT, übrige Sendungen DAP. Hinweis für Auslandssendungen: Ein Präferenznachweis/EUR1 wird von uns nicht ausgestellt. Bei Selbstabholung/EXW aus Drittländern und der EU werden 16% MWSt als Kaution einbehalten bis wir die Gelangensbestätigung/den Verbringungsnachweis des Käufers erhalten haben.
Zahlungsbedingungen
Wir akzeptieren keine Zahlung per Letter of Credit, PayPal etc. Der Rechnungsbetrag ist in jedem Fall ohne Abzug fällig. Die Ware bleibt bis zur vollständigen Bezahlung unser Eigentum. Skonto wird nicht gewährt.
|
Land |
Mögliche Zahlungsarten |
Bemerkung |
|
DE, AT, CH |
Rechnung, Vorkasse, Kreditkarte |
Eine Zahlung per Rechnung ist nur für Firmenkunden möglich. |
|
NL, BE, LU |
Rechnung, Vorkasse, Kreditkarte |
Eine Zahlung per Rechnung ist nur für Firmenkunden möglich. |
|
Alle weiteren Länder |
Vorkasse, Kreditkarte |
|
Es gelten unsere Allgemeinen Verkaufs-, Lieferungs- und Zahlungsbedingungen. Diese finden Sie hier. Zwischenverkauf, sowie Irrtum und Preisänderungen sind vorbehalten.
Statusdefinition
Alle Artikel sind gebrauchte Artikel, es sei denn ein Artikel wird explizit als Neugerät aufgeführt.
|
Status |
Zustand |
Bemerkung |
|
Sofort verfügbar |
gebraucht |
Der Artikel wurde bereits überprüft und befindet sich in einem einwandfreien Zustand. Er kann direkt an Sie versendet werden. |
| Lagergerät |
gebraucht |
Der Artikel befindet sich in unserem Lager. Unsere Techniker werden den Artikel vor der Auslieferung überprüfen. Sie erhalten voll funktionsfähige Artikel. |
|
Anbieter |
gebraucht |
Der Artikel befindet sich noch beim Anbieter. Nach Ihrer Bestellung wird er von uns angekauft, überprüft und an Sie versendet. Ein Funktionszertifikat und ein Servicebericht sind bei der Lieferung enthalten. |
|
Neugerät |
neu |
Es handelt sich um einen fabrikneuen Artikel. Es gelten die Garantiebestimmungen des Herstellers sowie die gesetzliche Gewährleistungsfrist. |
|
Labprocure |
gebraucht |
Verantwortlich für den Inhalt dieses Geräteangebotes ist die Labprocure GmbH als Geräteinserent. Labprocure übernimmt die Haftung für die hier inserierten Angebote und für die beinhalteten Fotos und Angebotstexte. Labprocure GmbH, Bruckstrasse 58, 72393 Burladingen. |
Firma: Kontron
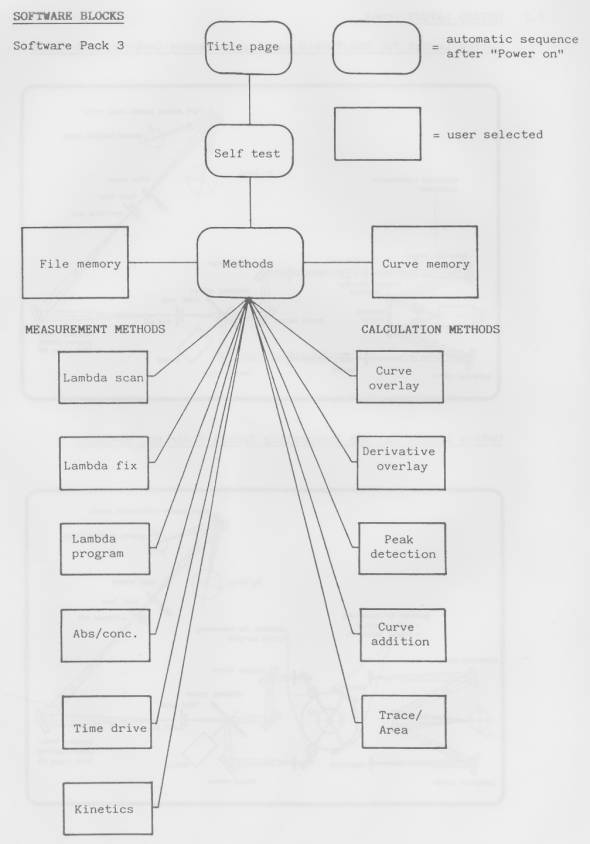
The following illustrations and descriptions are referring to the instrument model and are drawn from brochures. They are not representating the delivery volume. The exact delivery content you will find only in the offering text.
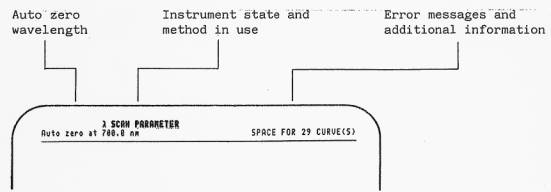
THE CRT MONITOR
The monitor is divided into three main sections:
- Instrument state and message section
- Parameter input/ Result output section
- UVISOFT key section
λ SCAN PARAMETER
Mode abs
X axis min * max 300*700 nm
Y axis min * max 0.008*2.000 abs
Scan Speed 100 nm/min
Cycle # 1
Cycle time 0.1 min
Spectral bandvidth 2.0 nm
Lamp change 340 nm
H lamp on
D2 lamp on
Baseline corr off
Beam double
Plotter mode off
Chart size 20 cm
Plot x axis incr. off
Plot y axis incr. off
RUN RUN CURVE FILE
SAMPLE DISPLAY BASELINE METHODS MEMORY
INSTRUMENT STATE AND MESSAGE SECTION
This section informs you about the actual method in use. The auto zero wavelength is displayed.
Error messages are displayed on the right hand side. The same space is used to provide additional information when entering parameters.
PARAMETER INPUT / RESULT OUTPUT SECTION
The parameters for measurement and calculation are entered in this section. The cursor keys an the keyboard äre used to shift the cursor to the desired spot on the screen. It can be moved within defined locations to enter parameters or to modify displays. The cursor is also used to "scroll" the input/output section of the screen
current cursor location
Mode abs
X axis min 0 max 300*700 nm
V axis min 0 max 0,000*2.000 abs
Scan speed 100 nm/min
Cycle # 1
Cycle time 0.1 min
Spectral bandaidth 2.0 nm
Lamp change 340 nm
H lamp on
D2 lamp on
Baseline corr off
Beam double
Plotter mode off
Chart size 20 cm
Plot x axis incr. off
Plot y axis incr, off
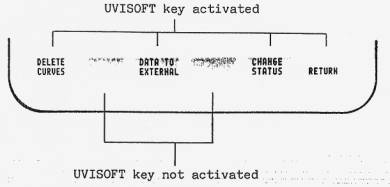
UVISOFT key section
The software defined "UVISOFT" keys K1-K6 are located an the keyboard. The function of each key is displayed on the monitor
KEYBOARD
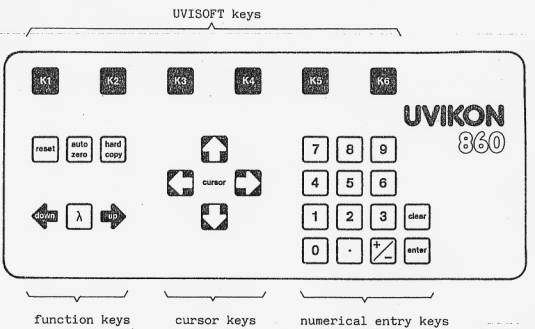
NUMERICAL ENTRY KEYS
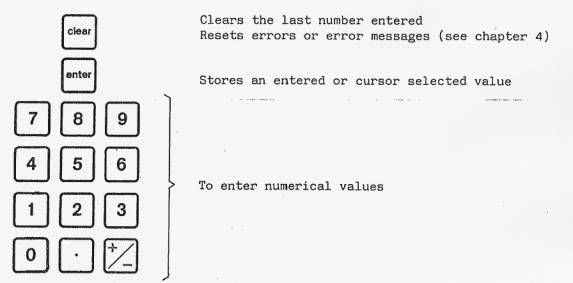
FUNCTION KEYS

The three Ä-control keys are activated when the instrument shows the display or results page and the wavelength and absorbance or transmission values are displayed in the input /output section. To enter a new wavelength press the A -key and enter the desired wavelength with the numerical keys. Press the enter-key to terminate the input. The up/down keys are used to move the monochromator manually. The monochromator can be moved in single steps by pressing the key repeatedly. For continuous movement keep the key pressed.

The reset-key is always activated, except during a calculation task (e.g. AUTOSCALING, PEAK DETECTION RUN, etc.). Pressing the reset-key causes the instrument to terminate all current activities and to set up the Methods page. All data and parameters stay in memory.
![]()
The auto zero-key is activated when the instrument is in standby and shows the parameter or display page. By pressing the auto zero key the wavelength and the auto zero value is displayed in the upper left hand corner of the screen. The auto zero can be deleted by pressing the key a second time.
When measuring single beam a new auto zero is stored every time the key is pressed.

The hard copy-key is activated when the optional Printer/Plotter P800 is connected. The hard copy function is used to obtain curves, result listings or parameter listings from the screen onto paper.
CORSOR KEYS
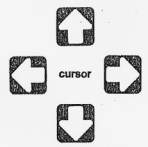
The cursor keys are used to move the cursor within defined locations in the input/output section of the screen. The cursor is also used to scroll the parameter page.
UVISOFT KEYS
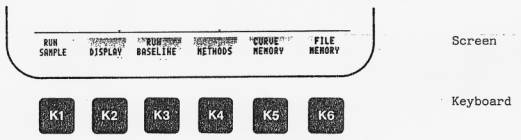
The UVISOFT keys are used to control the instrument. The related function to each key (K1K6) on the keyboard is displayed in the UVISOFT key section of the screen. A softkey is only activated when the function is displayed in the.corresponding field on the screen. UVISOFT keys-may be not activated when errors appear.
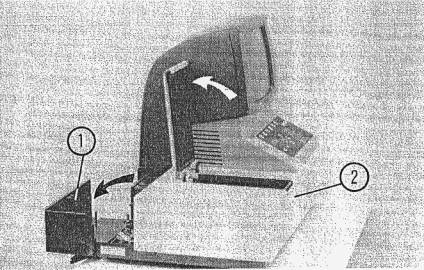
PREPARATION OF UVIKON 860
- Switch power off and unplug the mains cord.
- Open the snap cover (1) on the rearside and open_..thesample__com partment cover.
- Remove cell holder or other accessories from the sample compartment.
- Remove the white front panel (2) by pulling up
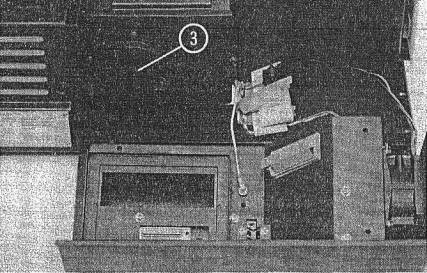
- Remove black plug (3), on the rear cover of the sample compartment.
INSTALLATION OF THE PELTIER MICRO FLOW CELL
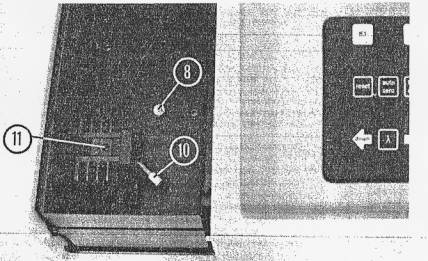
- Insert the Peltier Micro Flow Cell into the sample compartment and tighten it with the screw (8).
- The Peltier Micro Flow Cell has been factory installed for double beam Operation.
- Connect the in and outlet tubing (10, 11).
- Insert the new, white front cover (with vent slots) on the sample compartment from the top.
- Close the sample compartment cover.
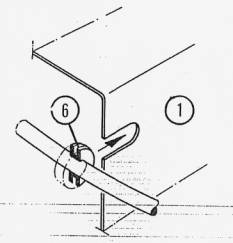
- Shift the grommet (6) of the Jong cable into the slot on the snap cover (1).
- Carefully close the snap cover.
Attention: Do not squeeze in any cables !
ADJUSTMENT OF THE PELTIER MICRO FLOW CELL
- The Peltier Micro Flow Cell has been factory adjusted.
- If an adjustment is necessary:
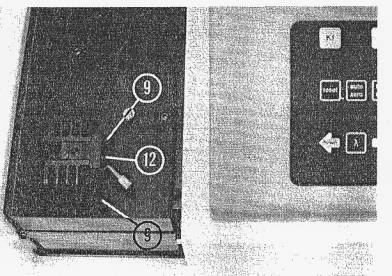
. Switch an the power to the Instrument (λ = 540nm) loosen screws (9)
- Plug the adjustment guide (12) into the light channel and tighten the screws (9).
- Remove the guide.