Kontron Uvikon 860
| Objektnummer | B00011662 |
|---|---|
| Numéro d'identification | 011662 |
| Nom de l'objet | Kontron Uvikon 860 |
| Statut | Stock unit |
Groupe de produits: Photmètres / Spectrophotomètres
Statut, conditions de livraison et de paiement
Vérification des appareils
Les appareils d’occasion sont vérifiés par Labexchange Service GmbH avant la livraison. Vous recevez des appareils entièrement fonctionnels.
Délai d'expédition
Les délais de livraison indiqués sont les plus rapides pour l’article en cause. Les délais de fait peuvent varier au cas par cas. Les délais de livraison définitifs sont indiqués dans la confirmation de commande.
Nous offrons des livraisons collectives par principe. Le délai de livraison s’oriente à l’article avec le délai de livraison le plus long. Une livraison partielle est possible par prix additionnel.
Méthodes d'expédition
Courrier, agences d'expédition, autocueillette, livraison par flotte de Labexchange
Conditions de livraison
Prix plus frais d’expédition. Les frais d’expédition indiqués sont à prévoir. Dérogations éventuelles sont possibles.
Si les coûts de transport ne sont pas spécifiés, s'il vous plaît demander séparément les frais de transport. Les frais de transport et d'emballage indiqués se réfèrent à l'itinéraire de transport le moins cher et sont sujets à des augmentations de coûts imprévues. En raison d'événements imprévisibles, les tarifs de transport et les délais de livraison peuvent changer à tout moment et doivent être adaptés à la situation actuelle. Incoterm codage selon les Incoterms 2010: Pour personnes qui viennent chercher les dispositifs elles-mêmes: EXW, pour les expéditions par voie maritime: CFR, par avion: CPT, d'autres expéditions: DAP. Remarque: Nous n'établissons pas des preuves préférentielles/EUR1. Dans le cas d’un enlèvement par vos soins/EXW de pays à l’intérieur ou à l’extérieur de la Union européenne, nous devons conserver 16% de TVA d’acheteur comme dépôt de garantie, jusqu’à ce que nous ayons reçu l’attestation de reception/la prevue de livraison.
Modalités de paiement
Nous n’acceptons pas le paiement par lettre de credit, PayPal, etc. Dans tous les cas le montant est payable sans déduction. Jusqu’au paiement complèt l’équipement reste notre propriété. Un escompte n’est pas accordé.
|
Pays |
Modalités de paiement possible |
Remarque |
|
DE, AT, CH |
Paiement par facture, prépaiement, par carte de credit |
Paiement par facture est possible pour clients professionnels. |
|
NL, BE, LU |
Paiement par facture, prépaiement, par carte de credit |
Paiement par facture est possible pour clients professionnels. |
|
Autre pays |
Prépaiement, par carte de credit |
|
Nos conditions de vente, de livraison et de paiement sont en vigueur. Vous pouvez télécharger les documents ici.
La vente intermédiaire nous est réservée.
Défintion des statuts
Tous articles sont d’occasion, sauf si explicitement défini comme « appareil neuf ».
|
Statut |
Condition |
Remarque |
|
Immédiatement disponible |
Occasion |
L’article a été déjà entièrement vérifié et peut être envoyé directement à vous. |
| En stock |
Occasion |
L'article est en notre stock, mais doit être vérifié avant la livraison par nos techniciens Vous recevez des articles entièrement fonctionnels. |
|
Publié |
Occasion |
L’article est toujours au l’offreur. Nous achetons, vérifions et en fin livrons l’article après votre commande. Le certificat de fonctionnement ainsi que le rapport de service sont inclus à la livraison. |
|
Appareil neuf |
Neuf |
C’est un dispositif neuf. L’article n’est pas utilisé et neuf d’usine. En ce qui concerne des article neufs, la garantie du fabricant est valable. |
|
Labprocure |
Occasion |
Responsable du contenu de l‘offre d’appareil est la société Labprocure GmbH, comme annonceur. Labprocure assume la responsabilité des offres annoncées ici ainsi que des photos et des textes d’offre inclus. Labprocure GmbH, Bruckstraße 58, 72393 Burladingen. |
Firma: Kontron
The following illustrations and descriptions are referring to the instrument model and are drawn from brochures. They are not representating the delivery volume. The exact delivery content you will find only in the offering text.
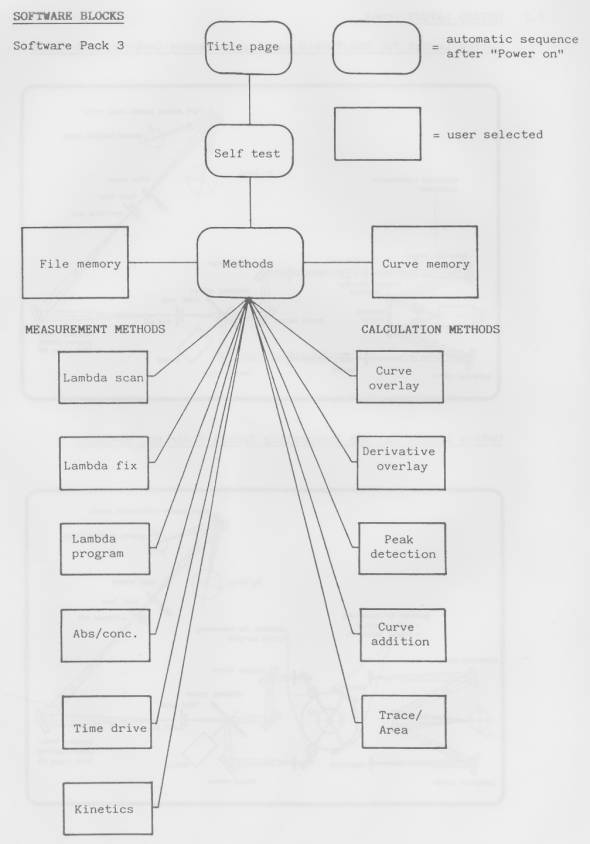
THE CRT MONITOR
The monitor is divided into three main sections:
- Instrument state and message section
- Parameter input/ Result output section
- UVISOFT key section
λ SCAN PARAMETER
Mode abs
X axis min * max 300*700 nm
Y axis min * max 0.008*2.000 abs
Scan Speed 100 nm/min
Cycle # 1
Cycle time 0.1 min
Spectral bandvidth 2.0 nm
Lamp change 340 nm
H lamp on
D2 lamp on
Baseline corr off
Beam double
Plotter mode off
Chart size 20 cm
Plot x axis incr. off
Plot y axis incr. off
RUN RUN CURVE FILE
SAMPLE DISPLAY BASELINE METHODS MEMORY
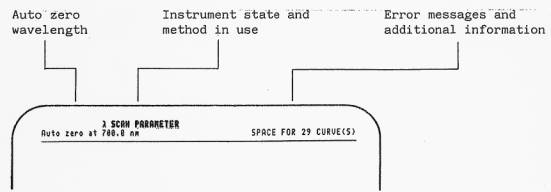
INSTRUMENT STATE AND MESSAGE SECTION
This section informs you about the actual method in use. The auto zero wavelength is displayed.
Error messages are displayed on the right hand side. The same space is used to provide additional information when entering parameters.
PARAMETER INPUT / RESULT OUTPUT SECTION
The parameters for measurement and calculation are entered in this section. The cursor keys an the keyboard äre used to shift the cursor to the desired spot on the screen. It can be moved within defined locations to enter parameters or to modify displays. The cursor is also used to "scroll" the input/output section of the screen
current cursor location
Mode abs
X axis min 0 max 300*700 nm
V axis min 0 max 0,000*2.000 abs
Scan speed 100 nm/min
Cycle # 1
Cycle time 0.1 min
Spectral bandaidth 2.0 nm
Lamp change 340 nm
H lamp on
D2 lamp on
Baseline corr off
Beam double
Plotter mode off
Chart size 20 cm
Plot x axis incr. off
Plot y axis incr, off
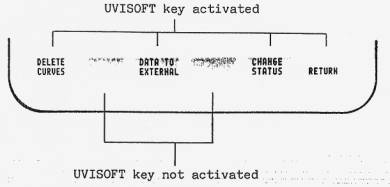
UVISOFT key section
The software defined "UVISOFT" keys K1-K6 are located an the keyboard. The function of each key is displayed on the monitor
KEYBOARD
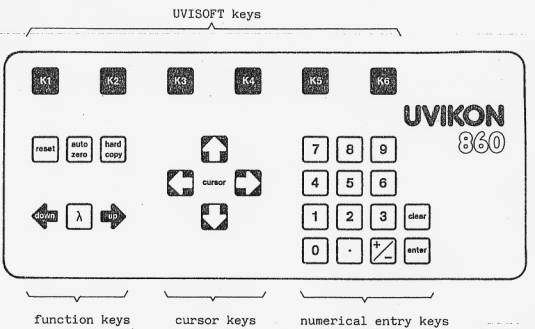
NUMERICAL ENTRY KEYS
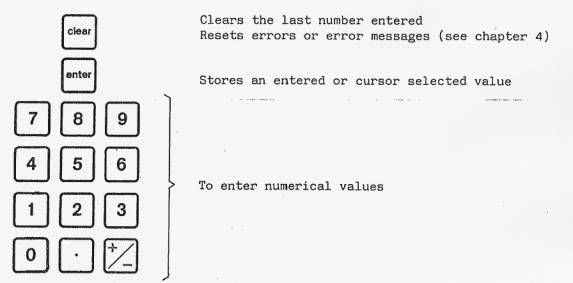
FUNCTION KEYS

The three Ä-control keys are activated when the instrument shows the display or results page and the wavelength and absorbance or transmission values are displayed in the input /output section. To enter a new wavelength press the A -key and enter the desired wavelength with the numerical keys. Press the enter-key to terminate the input. The up/down keys are used to move the monochromator manually. The monochromator can be moved in single steps by pressing the key repeatedly. For continuous movement keep the key pressed.

The reset-key is always activated, except during a calculation task (e.g. AUTOSCALING, PEAK DETECTION RUN, etc.). Pressing the reset-key causes the instrument to terminate all current activities and to set up the Methods page. All data and parameters stay in memory.
![]()
The auto zero-key is activated when the instrument is in standby and shows the parameter or display page. By pressing the auto zero key the wavelength and the auto zero value is displayed in the upper left hand corner of the screen. The auto zero can be deleted by pressing the key a second time.
When measuring single beam a new auto zero is stored every time the key is pressed.

The hard copy-key is activated when the optional Printer/Plotter P800 is connected. The hard copy function is used to obtain curves, result listings or parameter listings from the screen onto paper.
CORSOR KEYS
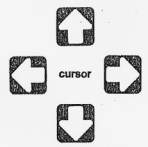
The cursor keys are used to move the cursor within defined locations in the input/output section of the screen. The cursor is also used to scroll the parameter page.
UVISOFT KEYS
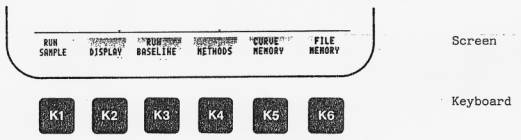
The UVISOFT keys are used to control the instrument. The related function to each key (K1K6) on the keyboard is displayed in the UVISOFT key section of the screen. A softkey is only activated when the function is displayed in the.corresponding field on the screen. UVISOFT keys-may be not activated when errors appear.
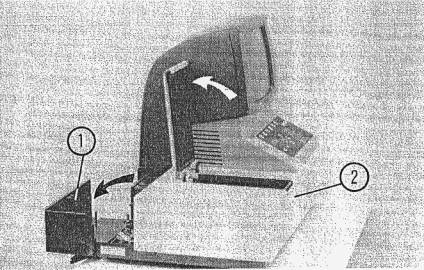
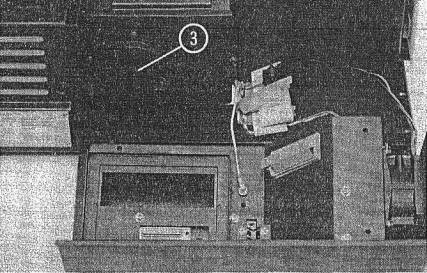
PREPARATION OF UVIKON 860
- Switch power off and unplug the mains cord.
- Open the snap cover (1) on the rearside and open_..thesample__com partment cover.
- Remove cell holder or other accessories from the sample compartment.
- Remove the white front panel (2) by pulling up
- Remove black plug (3), on the rear cover of the sample compartment.
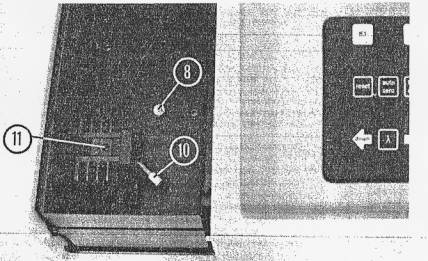
INSTALLATION OF THE PELTIER MICRO FLOW CELL
- Insert the Peltier Micro Flow Cell into the sample compartment and tighten it with the screw (8).
- The Peltier Micro Flow Cell has been factory installed for double beam Operation.
- Connect the in and outlet tubing (10, 11).
- Insert the new, white front cover (with vent slots) on the sample compartment from the top.
- Close the sample compartment cover.
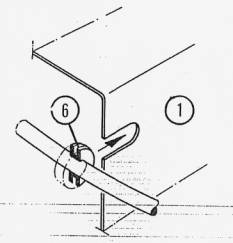
- Shift the grommet (6) of the Jong cable into the slot on the snap cover (1).
- Carefully close the snap cover.
Attention: Do not squeeze in any cables !
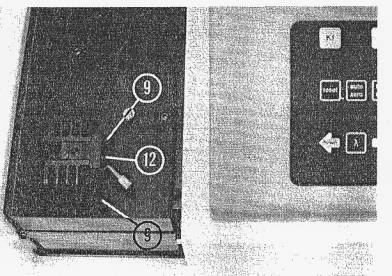
ADJUSTMENT OF THE PELTIER MICRO FLOW CELL
- The Peltier Micro Flow Cell has been factory adjusted.
- If an adjustment is necessary:
. Switch an the power to the Instrument (λ = 540nm) loosen screws (9)
- Plug the adjustment guide (12) into the light channel and tighten the screws (9).
- Remove the guide.