Kontron Uvikon 860
| Objektnummer | B00011662 |
|---|---|
| ID-number | 011662 |
| Object name | Kontron Uvikon 860 |
| Status | Stock unit |
Product group: Photometers / Spectrophotometers
Status, terms of delivery and payment
Verification of devices
The second-hand devices are verified by Labexchange Service GmbH before delivery. You are receiving only fully functional devices.
Dispatch time
The stated dispatch times are the shortest possible ones for each article. The effective dispatch times can vary. The effective dispatch times will be stated in the order confirmation.
As a matter of principle, we are offering collective deliveries. The shipping time is calculated based on the position with the longest lead time. A partial delivery is possible on explicit request.
Shipping methods
Parcel services, forwarding agencies, self-pickup, delivery by Labexchange fleet.
Delivery information
Prices exclude shipping costs. Stated shipping costs are to be expected. Deviations are possible. If transport costs are not specified, please ask separately for them.
The stated transport and packing charges apply to the most favorable route if transport and are to be understood as subject to verification due to unexpected cost increases. By reason of unpredictable events, cargo rates and delivery times can change at any time and therefore have to be adapted to the recent situation. Import formalities and possible customs charges will be borne by the purchaser. Incoterm coding according to Incoterms 2010: For persons who collect the devices themselves: EXW, for dipatch by sea: CFR, by air freight: CPT, other shipments: DAP. Note for international shipments: A proof of preference/EUR1 will not be issued by us. When self-collecting/ordering EXW from countries within or outside the European Union, 16% VAT will be retained as a deposit until we have received the corresponding confirmation of arrival/bill of delivery from the buyer.
Terms of payment
We do not accept payment by letter of credit, PayPal, etc. In each case the invoice amount is payable without deduction. Discount is not granted.
|
Country |
Possible payment methods |
Comment |
|
DE, AT, CH |
Payment by invoice, payment in advance, paymet by credit card |
Payment by invoice is only possible for corporate clients. |
|
NL, BE, LU |
Payment by invoice, payment in advance, payment by credit card |
Payment by invoice is only possible for corporate clients |
|
Other countries |
Payment in advance, payment by credit card |
|
Our General Terms of Sale, Delivery and Payment are valid and are available for download here.
The goods are offered subject to prior sale.
Definition of status
All articles are used articles, except an article is listed especially as a new device.
|
Status |
Condition |
Comment |
|
Immediately available |
Used | The article is fully functional and in impeccable condition. It can be shipped immediately. |
| In stock |
Used |
The article is on stock. Our service technicians will verify the article before delivery. You are receiving only a fully functional article. |
|
Published |
Used |
The article is still with the provider. After your order the article will be purchased and verified by us before being shipped to you. A certificate of operativeness as well as a service report are included in delivery. |
|
New device |
new |
The article is brand new and unused. Regarding new equipment the guarantee/warranty conditions of the corresponding manufacturer apply. |
|
Labprocure |
Used |
Labprocure GmbH, as the advertiser, is responsible for the content of this device offer. Labprocure assumes liability for the offers advertised here and for the photos and offer texts included. Labprocure GmbH, Bruckstraße 58, 72393 Burladingen. |
Firma: Kontron
The following illustrations and descriptions are referring to the instrument model and are drawn from brochures. They are not representating the delivery volume. The exact delivery content you will find only in the offering text.
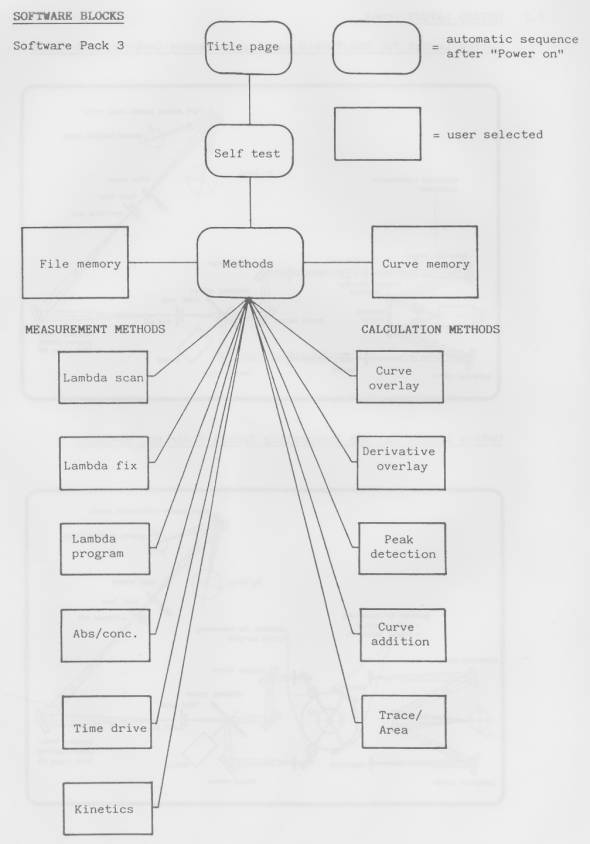
THE CRT MONITOR
The monitor is divided into three main sections:
- Instrument state and message section
- Parameter input/ Result output section
- UVISOFT key section
λ SCAN PARAMETER
Mode abs
X axis min * max 300*700 nm
Y axis min * max 0.008*2.000 abs
Scan Speed 100 nm/min
Cycle # 1
Cycle time 0.1 min
Spectral bandvidth 2.0 nm
Lamp change 340 nm
H lamp on
D2 lamp on
Baseline corr off
Beam double
Plotter mode off
Chart size 20 cm
Plot x axis incr. off
Plot y axis incr. off
RUN RUN CURVE FILE
SAMPLE DISPLAY BASELINE METHODS MEMORY
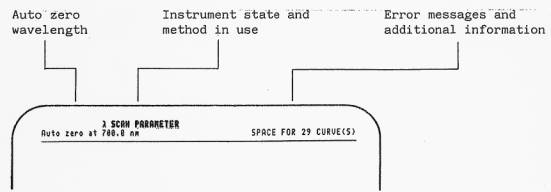
INSTRUMENT STATE AND MESSAGE SECTION
This section informs you about the actual method in use. The auto zero wavelength is displayed.
Error messages are displayed on the right hand side. The same space is used to provide additional information when entering parameters.
PARAMETER INPUT / RESULT OUTPUT SECTION
The parameters for measurement and calculation are entered in this section. The cursor keys an the keyboard äre used to shift the cursor to the desired spot on the screen. It can be moved within defined locations to enter parameters or to modify displays. The cursor is also used to "scroll" the input/output section of the screen
current cursor location
Mode abs
X axis min 0 max 300*700 nm
V axis min 0 max 0,000*2.000 abs
Scan speed 100 nm/min
Cycle # 1
Cycle time 0.1 min
Spectral bandaidth 2.0 nm
Lamp change 340 nm
H lamp on
D2 lamp on
Baseline corr off
Beam double
Plotter mode off
Chart size 20 cm
Plot x axis incr. off
Plot y axis incr, off
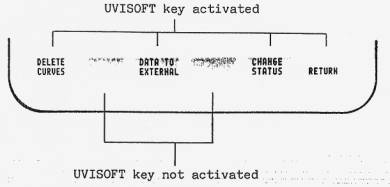
UVISOFT key section
The software defined "UVISOFT" keys K1-K6 are located an the keyboard. The function of each key is displayed on the monitor
KEYBOARD
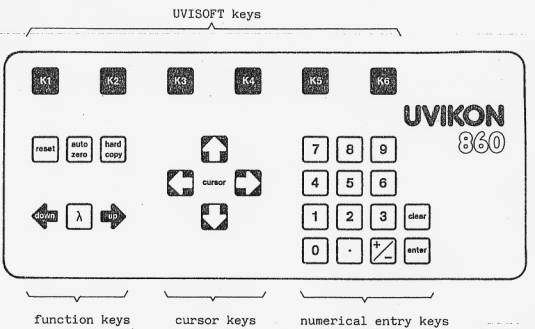
NUMERICAL ENTRY KEYS
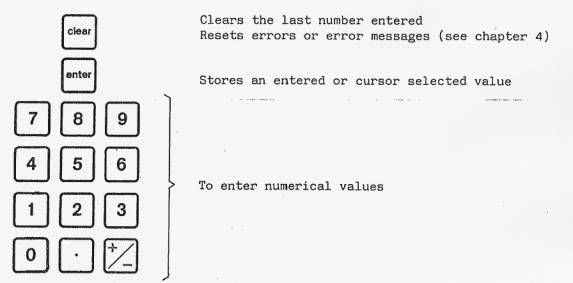
FUNCTION KEYS

The three Ä-control keys are activated when the instrument shows the display or results page and the wavelength and absorbance or transmission values are displayed in the input /output section. To enter a new wavelength press the A -key and enter the desired wavelength with the numerical keys. Press the enter-key to terminate the input. The up/down keys are used to move the monochromator manually. The monochromator can be moved in single steps by pressing the key repeatedly. For continuous movement keep the key pressed.

The reset-key is always activated, except during a calculation task (e.g. AUTOSCALING, PEAK DETECTION RUN, etc.). Pressing the reset-key causes the instrument to terminate all current activities and to set up the Methods page. All data and parameters stay in memory.
![]()
The auto zero-key is activated when the instrument is in standby and shows the parameter or display page. By pressing the auto zero key the wavelength and the auto zero value is displayed in the upper left hand corner of the screen. The auto zero can be deleted by pressing the key a second time.
When measuring single beam a new auto zero is stored every time the key is pressed.

The hard copy-key is activated when the optional Printer/Plotter P800 is connected. The hard copy function is used to obtain curves, result listings or parameter listings from the screen onto paper.
CORSOR KEYS
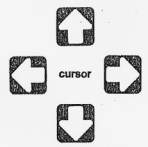
The cursor keys are used to move the cursor within defined locations in the input/output section of the screen. The cursor is also used to scroll the parameter page.
UVISOFT KEYS
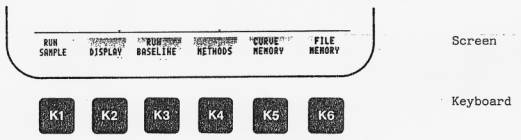
The UVISOFT keys are used to control the instrument. The related function to each key (K1K6) on the keyboard is displayed in the UVISOFT key section of the screen. A softkey is only activated when the function is displayed in the.corresponding field on the screen. UVISOFT keys-may be not activated when errors appear.
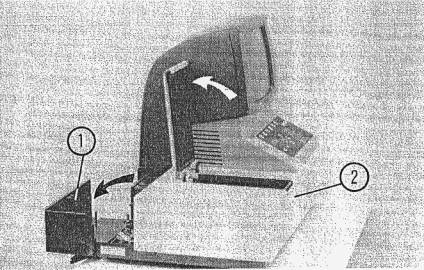
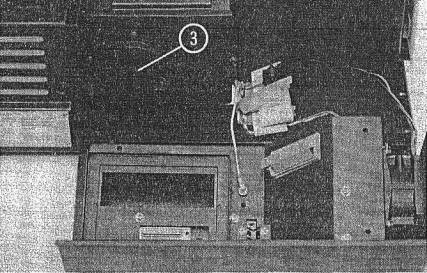
PREPARATION OF UVIKON 860
- Switch power off and unplug the mains cord.
- Open the snap cover (1) on the rearside and open_..thesample__com partment cover.
- Remove cell holder or other accessories from the sample compartment.
- Remove the white front panel (2) by pulling up
- Remove black plug (3), on the rear cover of the sample compartment.
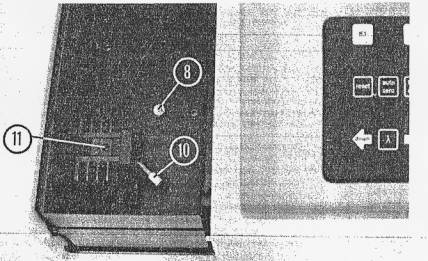
INSTALLATION OF THE PELTIER MICRO FLOW CELL
- Insert the Peltier Micro Flow Cell into the sample compartment and tighten it with the screw (8).
- The Peltier Micro Flow Cell has been factory installed for double beam Operation.
- Connect the in and outlet tubing (10, 11).
- Insert the new, white front cover (with vent slots) on the sample compartment from the top.
- Close the sample compartment cover.
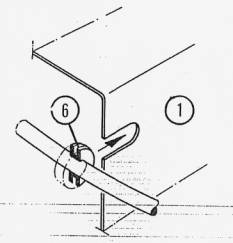
- Shift the grommet (6) of the Jong cable into the slot on the snap cover (1).
- Carefully close the snap cover.
Attention: Do not squeeze in any cables !
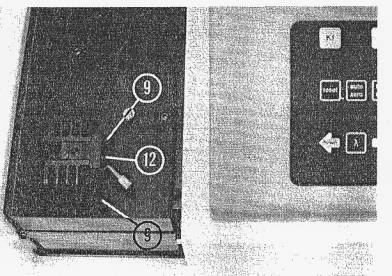
ADJUSTMENT OF THE PELTIER MICRO FLOW CELL
- The Peltier Micro Flow Cell has been factory adjusted.
- If an adjustment is necessary:
. Switch an the power to the Instrument (λ = 540nm) loosen screws (9)
- Plug the adjustment guide (12) into the light channel and tighten the screws (9).
- Remove the guide.